Showing posts with label Elizabeth Craft Designs. Show all posts

Wednesday, April 3, 2024

Spanner panel card


Card base size, 81/2" x 51/2"{-fold in half to make card base card size 41/4" x 51/2"
Fold the card base in half, along the 51/2" side cut 11/2", width from each end up to the fold line. The front panel will have 3 pieces. and the back will have one. Make matt and layers for decoration. Before adhering, the side matts attach a piece of acetate to the front side panel, to make a bridge that goes over the middle panel.


When the card opens there will be a layer that opens with the two panels on each end joined with the acetate, I have decorated these with the under the sea elements.
The next panel is decorated, and the sentiment is place so that it can be seen when the card is closed.


On the inside of the card make a matt that fits perfectly under the card front and decorate with matt layers that match the card front. A stamped sentiment and a place for you handwritten message will appear inside.


Friday, December 22, 2023

Faceted Hexagonal Aperture card


I recently found a tutorial on how to make this card, it was a couple of years old, but I thought it would be a bit of fun.
 I used a 6" x 6" pack of designer paper to decide on the card size. Cutting a card base into a 6" x 12" size I scored at 27/8", 53/4", 85/8", 111/2" leaving an 1/2" to glue the box together. 
On the 53/4" line mark 21/4" and 33/4" from these marks measure a straight line 11/2" either side of the center line, this will be your cut lines. Turning the card on its side the same center line measure done 1/2" mark and draw a line to the corners of the cut lines this will be your score lines. You should have 2 triangles scored either side of the rectangle.
Cut out the void between the cut lines to make a rectangle.
Using the score push them into the card to make the faceted hexagon shape. Fold the card so you can use it as a template for your first foil layer and fussy cut it out, then do the same with the designer paper. 
Before you glue down the front layers, you will need a strip of acetate 1" x 5", attach this to the card base centrally over the opening. You then can attach anything to the acetate that you want to pop up, usually a sentiment. I have added a bauble sticker that I had in my stash.
Glue the 1/2" tab to the other side to make a box. The box will fold flat for postage and can be posted in a 6" x 6" envelope.


If my instructions are a bit unclear you should be able to find the tutorial following the link at 
Thanks for looking,
 

Saturday, February 18, 2023

1st Birthday Puppy


I made this card for my Granddaughter's 1st Birthday earlier this month.
The last time I saw her she was just learning to say the word Dog. I made the puppy and added it to the designer paper background and die cut grass, I added the die cut kite, to match in with the designer paper.
The designer pack had some nice rainbow paper, so I layered it inside and added the Spinner square pop-up for the sentiment.


 Supplies:

My Favorite Things - Puppy Love
Karen Burniston - 1042 -Spinner square pop up
Elizabeth Craft Designs - Kite
Kaisercraft designer paper pack Fine & Sunny
Paper Rose Studio - sentiment

Sunday, February 12, 2023

Flower paper strips


 Hello,

Today I am sharing the card that I have made for a paper strip challenge.
I started with 1cm paper strip scraps in 2 different shades of pink and one of white. Linning them into rows, I then stamped, and heat embossed a background stamp. Attaching the strips to the card base with foam tape adding the die cut flowers, and finally the sentiment. 

Thanks for looking,
Have a great day,
Maryann

Saturday, February 4, 2023

Adventure Balloons


Today I am sharing the card that I made for a balloon challenge. I guess I could have gone with party balloons, but I rather like the idea of hot air balloons. It has been some time since I have played with these dies.

I have created a slimline card with a designer paper background. After assembling the balloons, I added them to the front of the card with foam tape. 
On the inside I added two panels of designer paper and created a box pop up, for the sentiment.


 Thanks for looking,

Maryann

Wednesday, December 15, 2021

Farewell

Hi Crafting Friends.

I recently made this card for a work collogue who was retiring.

I have used designer paper for the background and added the die cut alphabet letters and added the die cut butterfly with glitter wings. 


On the inside I made a pop up using the die and the designer paper was so suitable with the large print and then a good sized area for all the work collogues to sign in.


Supplies
Kaisercraft best wishes pop up
Elizabeth Craft designs butterfly silhouette die , micro fine glitter 
Karen Burniston 1053- alphabet die
Heidi Swapp designer paper
 
Thanks for looking ................


Saturday, October 30, 2021

Christmas Lantern

                                                                   Hi Crafting Friends

It is time for the last challenge of the month with the team on Crazy4Challenges.

 Let’s add some texture with a dimensional liquid or paste element on your card. Some examples are texture, crackle, molding or embossing paste, glass bead gel, Liquid Pearls, Nuvo Mousse, Nuvo drops, Crystal Glaze or Glossy Accents (used dimensionally rather than as a glue). 

I created the back ground using the brick stencil and sponging on various inks, while the stencil was in place I added transparent matte texture paste in certain places for a distressed wall.

While it was drying I assembled the die cut elements. Once the background was dry I added the die cut elements to make a scene.


Supplies
Lawn Fawn Stencil - Brick
Distress Oxide inks - dried marigold, brushed corduroy, festive berries
Ranger - transparent matte texture paste
Karen Burniston - 1171 Street Lantern Pop-up, 1165 Tiny Gnomes, 1178 Long Nature Edges
Elizabeth Craft Designs - sentiment ( retired)


Don't forget to check out the rest of the “Crazies” cards over on the Crazy 4 Challenges blog and also their individual blogs for more details.


Thanks for Looking ........

Saturday, September 25, 2021

Serendipity monochrome

 Our challenge on the Crazy4Challenges blog is to create a monochrome card - any color!

For my card I used a technique that I had learnt many years ago called serendipity. Over a piece of cardstock you glue pieces of torn paper of different textures, adding heat embossing and glitter as you go. Normally you would just cut up the panel and re-arrange it for a background, but since then, dies have come of age so I have used a background die to cut up the card panel, re-arranging the pieces.

I then added the die cut flowers and leaves and the sentiment and some pearls.


Don't forget to check out the rest of the “Crazies” cards over on the Crazy 4 Challenges blog and also their individual blogs for more details.
Maryann Einam- You are here

Thanks for stopping by today....

Saturday, July 17, 2021

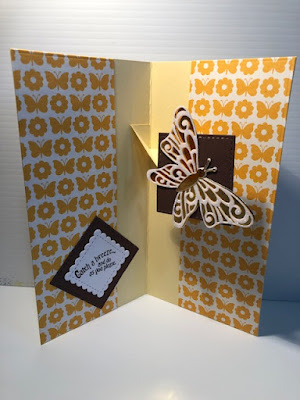
Catch the Breeze

 On the Crazy 4 Challenges blog is week 3 sketch challenge.

This is the card I have made I started by turning the sketch on its side. I made the butterfly using dies and micro fine glitter. I then used the insert die cut pieces for Newton Nook's slimline dies. 


I cut 3 panels of designer paper using slimline die, one for the front and two for the inside. I added the Katherine Label inside for the pop up and added the butterfly and square. I also added the sentiment inside. 


Supplies
Karen Burniston - 1011- Katherine Label pop up, 1151 Long rectangles crosshatch
Newton's Nook- Slimline Frames and Windows die
Stampendous - Sentiment
Elizabeth Craft designs -  Butterfly Silhouette, micro fine glitter.


Don't forget to check out the rest of the “Crazies” cards over on the Crazy 4 Challenges blog and also their individual blogs for more details.
Maryann Einam- You are here

Thanks for stopping by today....

Saturday, May 15, 2021

Make a wish

Today I have made a card for the Crazy 4 Challenges sketch challenge C4C584.


The focal sentiment is an older stamp set in my supplies. I added new floral dies cuts and on the inside I made a pop up card using Karen Burniston dies. I added the candle dies cuts as part of the make a wish theme.


 Supplies:
My Favorite things - sentiment
Karen Burniston dies - 1160 Flower Pivot Panel, 1101 Katherine Label pop up,
Elizabeth Craft Designs - candle and circle dies


Don't forget to check out the rest of the “Crazies” cards over on the Crazy 4 Challenges blog and also their individual blogs for more details.
Maryann Einam- You are here

Thanks for stopping by today....

Thursday, March 25, 2021

Black Magic using pencils

Hi Crafting Friends,

This is my card for the challenge on CCEE Stampers blog.

Apparently the 30th March is Pencil Day … For the challenge this week, feature pencils, colored pencils, crayons etc on your card creations. Either use this medium to color your image, or feature an image of pencils, crayons etc.

I don't use pencils too often but I recently watched a Gina K tutorial on Black Magic Technique with colored pencils. It looked like so much fun I thought I would give it a try.
I recently purchased the Holiday Tapestry stamp set, I thought the leaf flourish would be suitable for this technique. I was really happy with the results.


Firstly I stamped the image with moonlight white ink and once dried I added the colour pencils over the ink, because the ink was pearlescent it gave the image a nice glow.
I then added the dots with a white gel pen.
I created the owl using a die, after die cutting I placed it onto white card with double sided tape on it and then covered the whole are with microfine glitter. I the coloured the owl with copic markers.
Inside I placed a simple pop up sentiment.


Supplies: Gina K - Holiday Tapestry, Derwert -artists pencils, brillance ink - moonlight white, Karen Burniston - Katherine Label pop-up - Anita Frames pop-up (retired) Occasions stamp set (retired) owl die, microfine glitter, white gel pen, copic markers.

Don't forget to check out the CCEE Stampers blog to see the rest of the creations the CCEE Stampers have created this week. You can also see more details of their creations on their individual blogs.
Maryann Einam- You are here

Thanks for stopping by....


Thursday, March 11, 2021

Glitter Butterflies

                                                         Hi Crafting Friends

Today I am sharing my card for the CCEE Stampers blog challenge CCEE2110.

 Did you know that the 14th March Is Learn About Butterflies Day. Include at least one butterfly on your card this week.

I made the background using the Lavinia Stamps stencil Pods, with Distress inks - twisted citron, shaded lilac, abandoned coral, spun sugar. For the butterflies I created a background of destress oxide inks, Milled lavender, shabby shutters, iced spruce, worn lipstick. I then covered this with double sided tape and attached Elizabeth Craft designs butterfly stickers and covered them with cool diamond micro fine glitter. I then fussy cut them out and mounted them on foam before attaching them to the card. I then added the die cut sentiment.


Don't forget to check out the CCEE Stampers blog to see the rest of the creations the CCEE Stampers have created this week. You can also see more details of their creations on their individual blogs.
Maryann Einam- You are here

Thanks for stopping by....

Sunday, December 27, 2020

Happily Ever After

Hi Crafting friends, 

This is the card I made for my daughters wedding, the colour theme was red and white and black. After her first date was cancelled due to Covid 19 restrictions earlier in the year she decided not to put it off any longer and still has a 2020 date, but only a very small number of guests.

Firstly I layered my base card with the die cut layers, inside and out. On the front I have used the frame out of the Flip Frame popup dies set along with an Stamping Bella image, that I have had for awhile.


On the inside of the card I have used Karen Burniston's  Flip Frame pop up die and the flowers included in the set.


Then the Happily ever after die and the slim frames. The leaves are made in gold card stock and I added gem stones to the center of the flowers.


I have used my favourite wedding charm set from Karen's previous design company days. It has the Bride and Groom and the rings.
I added a boarder around the frame with white gel pen just to add some contrast to the black frame.


                        I added this white panel so that I had a place to write, our well wishes.


Thanks for looking today.....................


Saturday, October 3, 2020

Baby Treasure

This week on the Crazy 4 Challenges blog, our challenge is to make a baby card with fall colours.

 Let’s make a baby card. Apparently we are expecting a baby explosion after the quarantine months so we are likely to need them! As a fall bonus, use fall colours or woodland creatures on your card.

I made my card base using a step die. The monkey is a sticker that is coloured with copic marker over micro fine glitter.


Supplies
 Cherry Lynn step die, Karen Burniston -sentiment dies
copic markers, Elizabeth Craft Designs - micro fine glitter and sticker sheet. designer paper


Don't forget to check out the rest of the “Crazies” cards over on the Crazy 4 Challenges blog and also their individual blogs for more details.
Maryann Einam- You are here

Thanks for stopping by today....

Thursday, October 1, 2020

Mad Hatters Day

Welcome to today's card for the CCEE Stampers design blog challenge. This month we are welcoming two new design team members. Manal and Hazel welcome to the team. 

 Apparently the 6th October is Mad Hatter Day, so for our challenge this week, create a card inspired by the theme … Hats, Alice In Wonderland, Mad Hatter etc.


I didn't have anything in the Alice and Wonderland theme, so I just went with the white rabbit. It has been sometime since I have made a card using stickers and micro-fine glitter. To create the card I covered white card stock with double sided tape, then peel off the backing sheet. I then peeled off the sticker and attached it to the tape sticky sides together, being careful not to touch the sticky side using the release paper rub the sticker into the card. I then poured micro-fine glitter all over the image and it adhered to the area around the sticker. I then burnished the glitter into the card before colouring with copic markers.

Don't forget to check out the CCEE Stampers blog to see the rest of the creations the CCEE Stampers have created this week. You can also see more details of their creations on their individual blogs.
Maryann Einam- You are here
Thanks for stopping by....

Saturday, June 6, 2020

Glitter Lace

                                                           Hello Crafting friends.

 This month on the Crazy4Challenges blog it is my turn to be the Hostess with the challenges.
I had some time to do a bit of trivia research and came up with this idea.

The month of June derives it name from Juno, the Roman Goddess of marriage. It was thought that couples who married in June would be blessed with prosperity and happiness. Brides seem to have lace on their dress so please create a card with Lace …either Real or Faux.

I have create a Faux lace background using micro fine glitter. Using a piece of wide patterned lace I attached it to the card with double sided tape. I then added the micro fine green glitter and rubbed it into the tape so that it adhered though the lace pattern. I then pull off the lace and added black glitter over the green and it adhered to the exposed tape. I then attached the die cut piece, cut out of the white base card.


Don't forget to check out the rest of the “Crazies” cards over on the Crazy 4 Challenges blog and also their individual blogs for more details.
Maryann Einam- You are here
Thanks for stopping by today....

Thursday, April 30, 2020

Penguin hugs


Hi Crafting Friends,

This is my card for the challenge with my friends on the CCEE STampers blog.

Apparently the 25th April was World Penguin Day ... feature penguins on your cards this week. Don't have penguins, then create a black and white card.

As you can see I did find some penguins and to follow on from the challenge from week two this month, I decided to try a double stencil background.

I die cut a heart out of acetate and using the negative piece I placed it over the card and the put the heart stencil over the top and added the ink over the top with a sponge dauber making sure that I had good coverage before removing the stencils.
I had these penguins in my supplies from when I was trying out my brother scan and cut, I had cut out a heap of images just saving them until I needed them.


 I completed my card with a die cut sentiment layered 3 times and matted the die cut piece onto the card base.

Don't forget to check out the CCEE Stampers blog to see the rest of the creations the CCEE Stampers have created this week. You can also see more details of their creations on their individual blogs.
Maryann Einam- You are here

Thanks for stopping by....

Saturday, January 25, 2020

Birthday surprise

Today we are adding a ribbon to our cards for weeks's challenge with the design team on Crazy4Challenges.

I seem to have an endless supply of ribbons, I chose this polka dot one and coloured the image so that it matched the ribbon.


For the inside on the card I made a cup cake pop up for a birthday surprise.


Supplies
Beccy's Place stamps
Karen Burniston - 1008 - Cupcake pop-up
 stitched circles - various companies

Don't forget to check out the rest of the “Crazies” cards over on the Crazy 4 Challenges blog and also their individual blogs for more details.


Frances Byrne

Rebecca Endie
Kathleen Adams
Amy Ottmers 
Karen Ostergard
Tracey Farr
Maryann Einam- You are here
Nicky Foden
January Guest Designer Melody Blake

Thanks for stopping by today....


Thursday, December 12, 2019

I spy Santa

Today is the last 2019 challenge with for the CCEE Stampers. As part of the design team I would like to thank everyone for their support. We are taking a short break and will be back January 2nd 2020.

For this last challenge, we are asked to create a card which has a window. It will then be our choice on whether you want to be peeking IN on Santa or peeking OUT at Santa.


For my card I have used the windows to the world stamps and dies from Art Impressions, and have used a few other dies to create a stone cottage wall.


Don't forget to check out the CCEE Stampers blog to see the rest of the creations the CCEE Stampers have created this week. You can also see more details of their creations on their individual blogs.
Maryann Einam- You are here

Thanks for stopping by....

Saturday, September 14, 2019

International dot day

Hello
This is my card for the Crazy 4 challenges theme challenge.

Tomorrow 15th September is International Dot Day, so for our challenge this week  let's include dots on our card. Use dotted papers, white gel pen dots on images, large dots, small dots, whatever your heart desires.


Don't forget to check out the rest of the “Crazies” cards over on the Crazy 4 Challenges blog and also their individual blogs for more details.


Frances Byrne

Rebecca Endie
Kathleen Adams
Amy Ottmers 
Karen Ostergard
Tracey Farr
Maryann Einam- You are here
Nicky Foden
September Guest Designer - Kristine Reynolds

Thanks for stopping by today....