Showing posts with label Stampendous. Show all posts

Wednesday, December 24, 2025

Slimline Floating Cube Card


I recently watched a tutorial from Sam Calcott - mixed up crafts. Sam has done a mini series of floating cube cards in various sizes.
This is my take of the slimline floating cube card.
You can fold in the sides, to fit in an envelope, it folds fairly flat and should post in a standard size envelope.


Sunday, July 21, 2024

Tri Fold Robot Dog


I die cut the panels and the layers that came with this die set.
On the top layer instead of designer paper I embossed it with an embossing folder, I then took an ink pad and lightly rubbed it over the embossed areas.


I then stamped the robot dogs and coloured them and popped them on foam tape to add dimension to the card.


 Supplies
Stampendous - Robot dogs.
Cuttlebug - Clockworks embossing folder
Unknown - tri fold die set.

Monday, February 12, 2024

Pop out gate fold

This is a different take on the normal gate fold card, instead of the sides folding in, the middle pops up.


FRONT:
Base card: 5 1/2" x 8”
Black 2" x 3" 
White 1 3/4" x 2 3/4"
Black 1 7/8" x 5 3/8", cut 2
Black 1 1/8" x 1 7/8", cut 4
Designer Paper: 1 7/8” x 5 3/8, cut 2
Designer Paper 1 1/8” x 1 7/8”, cut 4
Stamped images and gem stones.

BACK:
Black 2" x 3" 
White  1 3/4" x 2 3/4"


Thanks for looking.


Sunday, December 24, 2023

Circle slide and Lock Gate Fold

I went a bit retro for these cards. I have had these images for some time in my stash of supplies.
I have used some embossing folders that I have had for some time. I used direct to paper technique to highlight the raised areas with gold ink. I then made a gate fold card base. 
Usually, a gate fold card is held closed with ribbon or a belly band. For this one I made a slide lock to hold the card closed.


I cut 4 circles, folding 2 in half and attaching the folded halves in the middle between the other 2 circles, this creates the lock. I the die cut the images and added them to the lock circles.


You can make the locks in other shapes or make the so that you can add shaped embellishments.


 Thanks for looking today.

Saturday, December 23, 2023

Wishing you Peace and Joy

 
Today I have for you another twist panel pop-up card. This style of card is great if you don't want to cover the designer paper that you have used. The inside pop-up panel just lifts out of the way so you can see the paper underneath.


 Thanks for looking today.

Wednesday, December 20, 2023

Chilly Days


 This is another stencil background that I had made the other day, this time I have used the distress inks, kitsch flamingo and shaded lilac. This time I have used a Penny Black snowman that I had found in my stash of stamped images.

Tuesday, December 19, 2023

Christmas Bow

I really enjoy making construction cards, I wanted to show card this beautiful ribbon that I found in my stash of supplies. I just added it to the front with a die cut sentiment.


On the inside is the pop -up surprise. I have used the twist panel die to create the pop up and attached some small, stamped images.

Supplies
Karen Burniston designs - 1009 twist panel pop-up.
      1177 Merry Christmas shadow
1065 Merry Christmas
stampendous clear stamps


Sunday, December 17, 2023

Stencil snowflakes


I finally made it into the craft room to make a few Christmas cards. I pulled out this stamp set which had a snowflake stencil included.
I used two shades of distress ink to add dimension to the snowflakes, I then used dies to cut the rectangle and snow hills. I stamped the images and fussy cut them out popping the extra arms up for a 3D effect.

Supplies:
Distress ink - Salty ocean and Chipped Sapphire.
Stampendous cling stamp set, winter friends

Tuesday, October 24, 2023

Hydrangea Garden


 For this card I started with the stenciled background, I have used the Lavinia stencil Flourish and Distress ink with Evergreen bough and twisted citron. I stamped the Hydrangea flower onto designer paper and cut it out and attached it to the card with foam tape. For the leaves I stenciled with the ink and added a darker layer of ink on the edges. I coloured the butterfly with copic alcohol pens. I added the sentiment from the stampendous thoughtful wishes, sentiment set.

Have a great day.

Friday, December 23, 2022

No Peeking until Christmas

My card today is another this time I have made it as a landscape stand-up box pop up. This is another image that I had in the Christmas stash box. 
These are the instructions that I shared the other day. I just adjusted them, so that the picture panel fitted.
I made the card to fit into a business size envelope. I have used inches for my measurements, as I have used a score board with inch markings. I cut the card 4" in width. I then scored at 7", 8", 10" and 11" along the long side. Fold the score lines and glue the last tab to make a box. For this card I cut a separate piece 31/2" wide and score at 10", 11" the piece is then cut to size depending on the decorations. I then attached the card onto the base card using the tabs.


 Thanks for looking today...

Thursday, November 24, 2022

Seaside Holiday

Hi Crafty Friends

Today is my last challenge for the month on the CCEE Stampers blog.

What ever the season it is great to get away, celebrate the day with a seaside holiday. Use the seaside for inspiration for your card today.

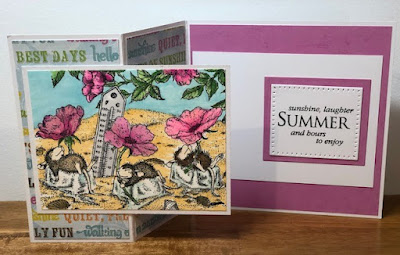
This stamp is one of the wood mounted House Mouse stamps that I have had for years, but it is a great image I just had to use it this week.


I made a z fold card using the main image as the focal point. Inside I added the summer sentiment.
The z fold card is a great way to show off a large image and add a bit of a fun element.


Don't forget to check out the CCEE Stampers blog to see the rest of the creations the CCEE Stampers have created this week. You can also see more details of their creations on their individual blogs.
Maryann Einam- You are here

Thanks for stopping by....

Thursday, November 3, 2022

Walk your dog

Hi Crafty Friends,

This month on the CCEE Stampers Blog I will be the hostess bring you the challenges.

According to the days of the year calendar, it is walk your dog week. Walk you dog week is a week holiday dedicated to bringing your dog a healthier lifestyle. Make a card with your furry friend in mind.


On the front of my card today I thought I would use a wobble spring behind the head of the puppy, just a bit of interactive fun on this card. I folded the card base and added designer paper on the front and on the inside. I used a die for the grass and the sentiment banner.


On the inside I created a pop up scene. I die cut a square and made it look like a wooden box using a woodgrain stamp. I then stamped the dog head, coloured them and fussy cut them out. I made two small boxes and added the to the base card behind where I wanted to place the box. I then added the puppy heads. I then added the die-cut clouds and the sentiment panel.


Don't forget to check out the CCEE Stampers blog to see the rest of the creations the CCEE Stampers have created this week. You can also see more details of their creations on their individual blogs.
Maryann Einam- You are here

Thanks for stopping by....

Thursday, March 31, 2022

I Love Paris

Hello Crafting Friends,

A quick easy card for today's challenge on the CCEE Stampers blog.

Apparently today is Eiffel Tower Day - create a card with a French theme, bonus points if you include the Eiffel Tower. 

I made my card using a designer paper background and a heat embossed Stampendous stamp.


Don't forget to check out the CCEE Stampers blog to see the rest of the creations the CCEE Stampers have created this week. You can also see more details of their creations on their individual blogs.

Maryann Einam- You are here

Thanks for stopping by....

Saturday, October 23, 2021

Parisian Dreams

Welcome to another challenge week with crazies team on Crazy4Challenges.


This week use vellum or acetate on your card 


I have adhered a serviette onto white card stock to create the background. I then cut a piece of acetate to size, I then stamped the Stampendous image with stazon ink. Once it dried I attached it over the serviette with brads before adding it to the base card.


Don't forget to check out the rest of the “Crazies” cards over on the Crazy 4 Challenges blog and also their individual blogs for more details.
Maryann Einam- You are here


Thanks for stopping by today....

Saturday, July 17, 2021

Catch the Breeze

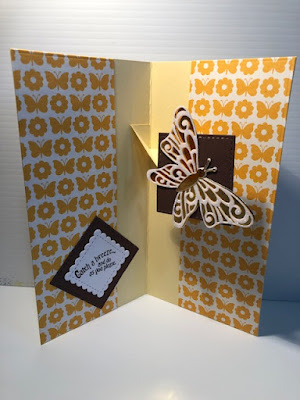
 On the Crazy 4 Challenges blog is week 3 sketch challenge.

This is the card I have made I started by turning the sketch on its side. I made the butterfly using dies and micro fine glitter. I then used the insert die cut pieces for Newton Nook's slimline dies. 


I cut 3 panels of designer paper using slimline die, one for the front and two for the inside. I added the Katherine Label inside for the pop up and added the butterfly and square. I also added the sentiment inside. 


Supplies
Karen Burniston - 1011- Katherine Label pop up, 1151 Long rectangles crosshatch
Newton's Nook- Slimline Frames and Windows die
Stampendous - Sentiment
Elizabeth Craft designs -  Butterfly Silhouette, micro fine glitter.


Don't forget to check out the rest of the “Crazies” cards over on the Crazy 4 Challenges blog and also their individual blogs for more details.
Maryann Einam- You are here

Thanks for stopping by today....

Saturday, May 22, 2021

Deep in the ocean

This is my card for the Crazy 4 Challenges, challenge C4C585.

Add an Embellishment... Tags. Make a project using a tag as an embellishment or layer.

I have made a mini slimline card for today's challenge.

I created the background using distress oxide inks in salty ocean and broken china. Using the Tim Holtz glass mat. I then used Lavinia stencil pebbles to added layers of ink.

I then heat embossed the Jalandhar in black ink and added wink of stella for some sparkly highlights.

I then created a tag using an element from Karen Burniston 1023 Tag Book pop up die set.

Supplies;
Distress oxide inks - salty ocean, broken china, peacock feathers, shabby shutters, twisted ocean.
Lavinia stamps - Jalandhar and pebble stencil
Karen Burniston - 1023 Tag Book pop - up die
Stampendous - sentiment

Don't forget to check out the rest of the “Crazies” cards over on the Crazy 4 Challenges blog and also their individual blogs for more details.
Maryann Einam- You are here

Thanks for stopping by today....

Saturday, January 16, 2021

Warm and Feathered Hugs

Hi Crafting friends,

Today is the sketch challenge with the design team on Crazy 4 Challenges blog.

I love this bird stamp set from Stampendous, while I was deciding what to use for this card I came across the bird cage die in my older My Favorite Things items, rather that use the bird die that come in the set I used the bird stamps.


On the inside I have used a pop up platform die to create a nesting spot for the birds.


Don't forget to check out the rest of the “Crazies” cards over on the Crazy 4 Challenges blog and also their individual blogs for more details.
Maryann Einam- You are here

Thanks for stopping by today....

Saturday, January 9, 2021

Hello new friend

Happy New Year! Well I hope everyone has a Happy start to 2021. Today is the first challenge with the design team on Crazy 4 Challenges. 

Our challenge is to celebrate the New Year by creating a card or project using something new! New technique, new product, new style, etc.

I recently purchased some of the Lavinia products, as I discovered at the end of last year using two stencils to create you backgrounds. This is the first time that I have applied ink to these product and I had so much fun creating.

I applied the inks through the stencil, then I did the stamping in black ink and heat set  the whole card. I then added the Nuvo aqua shimmer pen to the mermaid tail and add some gold and silver gel pen to the hair. I then added the sea grass to fill in the edges.  


Supplies:

Lavinia stamps Althea , Sea Creatures, sea grass

Lavinia stencils - coral, pebbles, 

Stampendous -sentiment

distress oxide inks - brushed corduroy, speckled egg, stormy sky, shabby shutters. Nuvo aqua shimmer pen


Don't forget to check out the rest of the “Crazies” cards over on the Crazy 4 Challenges blog and also their individual blogs for more details.
Maryann Einam- You are here

Thanks for stopping by today....

Thursday, January 7, 2021

Life Changes

Today is the first challenge for this year with the CCEE Stampers blog design team.

Life Changes The new year usually means New Year’s Resolutions. For today’s challenge I would like for your card to feature something that you could add to or subtract from your life to improve the quality of your physical or mental health. This can be tongue-in-cheek or the real deal. You decide

I have been wanting to add some yoga to my life to help me with joint stiffness and flexibility and if I can lose a few kilograms, I will feel so much better.

I love this cute little frogs in yoga poses. I added distress oxide backgrounds to the panels of the slimline die.


Supplies: Stampendous frog yoga stamps, Newton's Nook designs slimline die, Distress oxide inks - blueprint sketch, squeezed lemonade, twisted citron.

Don't forget to check out the CCEE Stampers blog to see the rest of the creations the CCEE Stampers have created this week. You can also see more details of their creations on their individual blogs.
Maryann Einam- You are here

Thanks for stopping by....

Thursday, October 15, 2020

Artist's tools

It is time to join the design team on the CCEE Stampers Blog for this week's challenge.

Tomorrow is Dictionary Day. For our challenge this week, create a card that includes words on your card. Maybe a scripty word background either stamped or using patterned papers, large focal sentiment, Speech bubbles with words inside etc. 


I made this card using the Black ice technique. It looks really nice is real life but it is a bugger to photograph.

Using foil card, I stamped the image and heat embossed it. I the added some swipes of stazon ink and heat set it. I then added versamark ink and embossing powder and heated it. For the background the image several times with black ink.


Don't forget to check out the CCEE Stampers blog to see the rest of the creations the CCEE Stampers have created this week. You can also see more details of their creations on their individual blogs.
Maryann Einam- You are here

Thanks for stopping by....