Tuesday, February 20, 2024

Crabby Wishes

I made this card for my Granddaughter who has turned 2 this month. When she visited last time, we took her to an aquarium and she enjoyed the SeaLife, especially feeding the turtles.


I created an under the sea theme for the inside of the card. Using the mini pops pop-up die to make the pop-up part of the card I then die cut the wavy edges to look like water and added the sea life.


 Supplies
Sentiment Stampendous
Karen Burniston 1068 Ocean Animals, 1037 Sea Animals, 1036 Princess and Mermaid, 985 Rocky the Crab, 1180 Big Birthday Charms, 1146 mini Pops pop-up
Lawn Fawn Wavy edges

Thanks for looking.


Tuesday, February 13, 2024

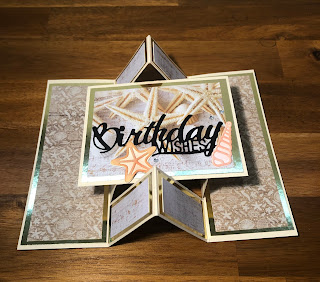
Pop up gate fold shells

This is another version of the pop-up gatefold card. This time the front panel is a larger so that I could fit in the die sentiment and added die cuts.

 FRONT:
Base card: 5 1/2" x 8”
Front panel 4" x 3 1/4"
Gold foil 3 3/4" x 3" 
Designer Paper 3 1/2" x 2 3/4"
Gold Foil 1 7/8" x 5 3/8", cut 2
Gold foil 1 1/8" x 1 7/8", cut 4
Designer Paper: 1 7/8” x 5 3/8, cut 2
Designer Paper 1 1/8” x 1 7/8”, cut 4
Happy Birthday Die, shells and gems


Thanks for looking

Monday, February 12, 2024

Pop out gate fold

This is a different take on the normal gate fold card, instead of the sides folding in, the middle pops up.


FRONT:
Base card: 5 1/2" x 8”
Black 2" x 3" 
White 1 3/4" x 2 3/4"
Black 1 7/8" x 5 3/8", cut 2
Black 1 1/8" x 1 7/8", cut 4
Designer Paper: 1 7/8” x 5 3/8, cut 2
Designer Paper 1 1/8” x 1 7/8”, cut 4
Stamped images and gem stones.

BACK:
Black 2" x 3" 
White  1 3/4" x 2 3/4"


Thanks for looking.


Tuesday, February 6, 2024

Stadium Wave Card

This card is called a Stadium wave or just wave card. As you open and close it, it resembles a crowd wave at a Stadium.
I found several tutorials for this card, I changed my measurements to suit, the Australian measurements, but the basic principle of the wave is the same regardless of the card size.


Measurements
I have kept the measurements in inches.
Card base 11 x 4 1/4 inches, fold in half and score at 5 1/4" from each end. Which will make a book cover fold so that the wave can fit inside. Make matt layers for the front and 2 inside panels. 


For the wave I have used heavy designer paper but you could use light weight card.

wave measurements

6 x 7 3/4 inches

 along 7 3/4" side score at 3, 3 3/4, 4 1/2, 7 1/2 then on the 6" side cut 6, 1" strips.
Reinforce the score lines, fold and glue the top 1/4" so that you have what looks like a W. Glue the 6 pieces together, overlapping each piece by 1/2" so that it looks like a wave.

Make the card base and attach the wave pieces into the center, of the card so that it cannot be seen outside the folded card.

I attached the butterflies, so that they appear to be in flight as the card is opened.


Make a belly band to size by folding a piece of card around the base card so that it slips off easily. Decorate as you wish.

Have fun, Thanks for looking.


Saturday, February 3, 2024

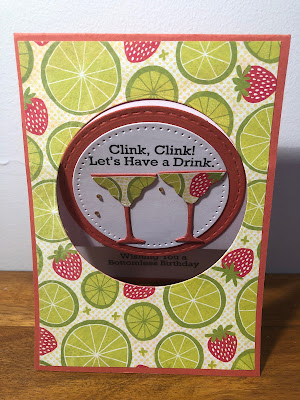
Clink Clink

I had so much fun creating this style of card last year, that I have made another for a card class that I have taught.
Teaching some people new to card making with a little bit of stamping, die cutting and folding to make a fun pop-up card.


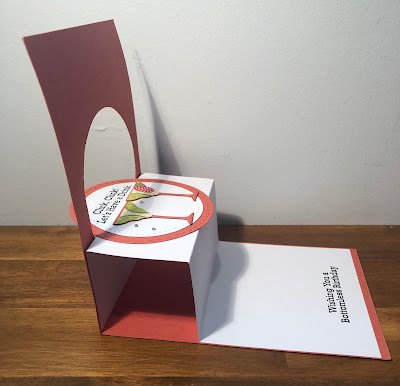
The card can be made any size to fit in an envelope. Fold your card stock in half and attach some designer paper on the front, then die cut a circle. Using another piece of card (for this card I am just calling the white card, but of course you can make it any colour) cut to fit inside the card base, leaving a small border around the edges. Using this white piece of card fold it in half and then score on half in half again. Attach it inside the base card glue it by the large panel on the bottom and then the top piece to the top of the card so that it looks like a z, leaving the middle panel unglued. 
 Put it aside to work on the next step. Die cut a piece of base colour card with the same die that you cut the original circle, then decorate it. While the card is in the closed position attach the circle through the hole and just add glue to the middle panel that shows through the hole.
As you open and close the card the attached circle with move through the hole. I then just decorated the bottom of the card to match the circle.


I have used the Karen Burniston charm die and the MFT A toast to you, sentiment stamp set.


 Thanks for looking.