Showing posts with label Acetate. Show all posts

Thursday, December 2, 2021

On the 1st day of Christmas

This my card for the first December card challenge with the team on the CCEE Stampers blog. 

Music plays a huge part in the celebration of the Christmas holidays for many, many people. We hear holiday music played in churches, piped to us in stores, coming through our radios, and featured on holiday specials on T.V. throughout the month of December.

For today's challenge, "Celebrate with Song," Lynn is asking that the CCEE Stampers use song lyrics from a holiday song (either secular or religious) as the sentiment on the front of a Christmas design.

I had this DCWV 12 days of Christmas designer paper pack in my stash that I had purchased some time throughout the year. It has some artist trading card size pieces the coordinated with the designers paper., that I wanted to show case.

 So I have made and interactive card using Karen Burniston's Rocking Rectangle Pop-up.


I made the card with an acetate front window to show off the panel in side and the movement that happens when the card opens.


Don't forget to check out the CCEE Stampers blog to see the rest of the creations the CCEE Stampers have created this week. You can also see more details of their creations on their individual blogs.
Maryann Einam- You are here

Thanks for stopping by....


Thursday, October 28, 2021

Winter blizzard

This is my card for the CCEE Stampers blog challenge - CCEE2143.

Create a Scene! For our challenge this week create a card that features a scene of some type… outside or inside.

I have used the Hero Arts 6 x 6 background stamp for my scene. I rather thought that just stamping the scene was way to easy for this challenge so I created a shaker card with an acetate front and glitter for the snowy winter scene.


Don't forget to check out the CCEE Stampers blog to see the rest of the creations the CCEE Stampers have created this week. You can also see more details of their creations on their individual blogs.
Maryann Einam- You are here

Thanks for stopping by....

Saturday, October 23, 2021

Parisian Dreams

Welcome to another challenge week with crazies team on Crazy4Challenges.


This week use vellum or acetate on your card 


I have adhered a serviette onto white card stock to create the background. I then cut a piece of acetate to size, I then stamped the Stampendous image with stazon ink. Once it dried I attached it over the serviette with brads before adding it to the base card.


Don't forget to check out the rest of the “Crazies” cards over on the Crazy 4 Challenges blog and also their individual blogs for more details.
Maryann Einam- You are here


Thanks for stopping by today....

Saturday, September 4, 2021

Sapphire Birthday blue

Today the on Crazy4Challenges Blog. Hostess Karen has issued us this challenge.

 September is my birth month. To start my birthday month celebration, make a birthday card with some dark blue - as my birthstone is the sapphire

I have made my card with designer paper, often in the paper packs there are decorated sentiment pieces that you can cut out.

I used the Rockin Rectangle die to make the card base. The front of the card is clear using a piece of acetate so that you can see the designer panel.


When you open the card the mechanism pops out the panel.


Supplies:
Karen Burniston - Rockin Rectangle pop up 
American Crafts designer paper pack- patio party


Don't forget to check out the rest of the “Crazies” cards over on the Crazy 4 Challenges blog and also their individual blogs for more details.
Maryann Einam- You are here

Thanks for stopping by today....


Saturday, April 11, 2020

Showers and rainbows

Welcome to this weeks challenge with the Crazy4Challeges design team.

You know what they say April showers bring May flowers, so this weeks challenge is to make a card with rain or a rainbow on it.


I have crated a card with a split front and have the rainbow join the two halves together. I created the rainbow with circle dies glued together and added the hedgehog and clouds to finish the card. On the inside I added the cloud stencil on the inside of the card so that you can see it through the front panel.


I found that the card was too flimsy so to help with the strengthening of the card I added some acetate in between the layers, but still kept the look that I was after.


Don't forget to check out the rest of the “Crazies” cards over on the Crazy 4 Challenges blog and also their individual blogs for more details.
Maryann Einam- You are here
April Guest Designer - Meghan Kennihan 

Thanks for stopping by today....


Saturday, November 30, 2019

Inspiration Art


Today the Crazies team on Crazy 4 Challenges hostess Nicky supplied us with a art image for inspitation.


I have created an acetate window card front and inside I have used Karen Burniston Rockin' Rectangle pop-up die and the Stampendous stamp set.


Don't forget to check out the rest of the “Crazies” cards over on the Crazy 4 Challenges blog and also their individual blogs for more details.
Maryann Einam- You are here

Thanks for stopping by today....

Saturday, November 23, 2019

Snow Drift Blessings

Today we have another challenge hosted by Nicky for the Crazy 4 Challenges blog.

For this challenge, I was trying to find ideas that I haven't seen in other challenges so. I thought that it would be fun to use a card that we had received from someone else as inspiration. It can be a handmade card or a store-bought card.

I went craft shopping with a friend the other day and purchased a few things. My friend commented that I happen to have a snow theme happening, so I just continued with the theme for today's card.

I created my with several die sets from Karen Burniston.
1064 - Christmas tress pop stand
1011 - Katherine Label pop-up
1006 - Nature Edges
1017 - Snowmen
 The sentiment is from the stampendous stamps set holiday expressions.


This is my inspiration card, I received it last year. You can following the link for more detailed information on how to make the original card here.


Don't forget to check out the rest of the “Crazies” cards over on the Crazy 4 Challenges blog and also their individual blogs for more details.


Frances Byrne

Rebecca Endie
Kathleen Adams
Amy Ottmers 
Karen Ostergard
Tracey Farr
Maryann Einam- You are here
Nicky Foden
November Guest Designer Lisa Reynolds Bzibziak
Thanks for stopping by today....


Thursday, November 29, 2018

Circles and Squares

Welcome to today's challenge with the CCEE Stampers team

Circles and squares are simple geometric shapes. Make a card using at least one of each.


It is the time of the year when you just need another Christmas card, I like the idea of having the star floating in the center circle and the little Santa Bear flying through the stars.
I used  gold foil card for the Merry Christmas die cut for a little bit of glamour.


Don't forget to check out the CCEE Stampers blog to see the rest of the creations the CCEE Stampers have created this week. You can also see more details of their creations on their individual blogs.
Maryann Einam- You are here

Thanks for stopping by....

Thursday, May 3, 2018

May Flowers

Welcome to this weeks CCEE stampers challenge.
Anne is our  hostess for the month of May.  Since April showers bring May flowers, my first challenge is to fill your card with pretty flowers.


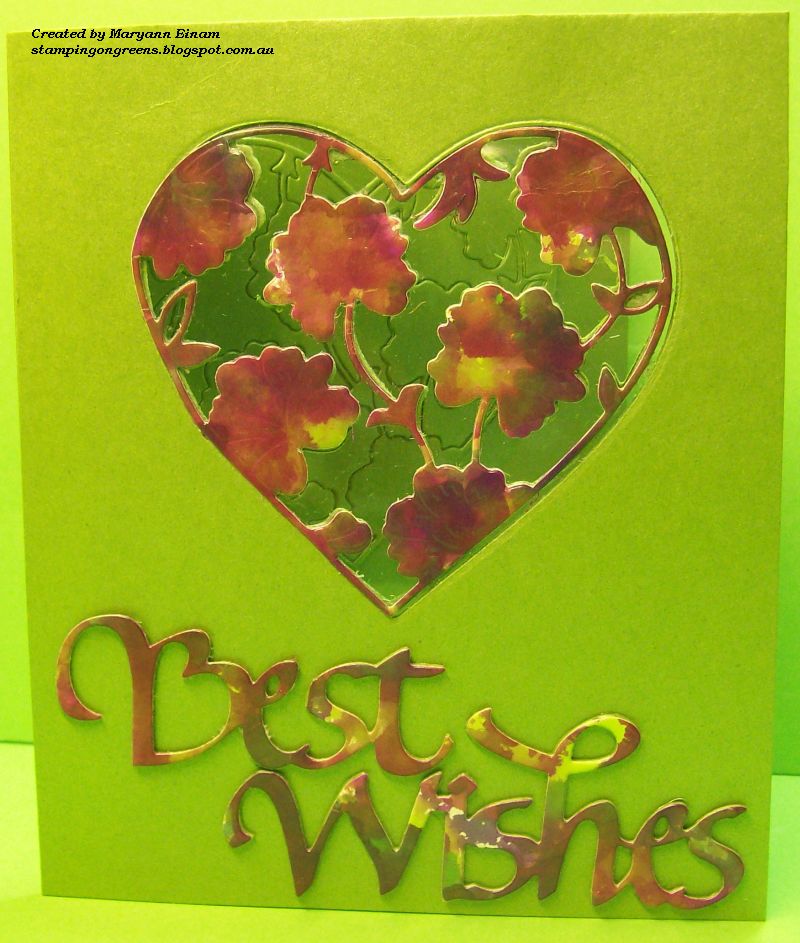
For my card I used the alcohol ink background panel that I created the other week, this time I have used gloss card. I have had this heart die for awhile and I could see it as a stain glass window frame. I die cut my panel into the front of the card and glued the insert back onto the inside of the card replacing all the pieces so that it looks like an embossed panel. On a piece measuring the same as the front of the card I cut another window, I then added acetate to the front panel and glued the extra cover card sandwiching the acetate in between. I then cut the alcohol ink heart and glued it to the acetate and on the inside I added a green die cut to match the card. The sentiment is also die card with the alcohol ink card.
Sorry about the poor quality photo but I just couldn't get it without the green card reflection, I guess it just matches my blog name stamping on greens. LOL


Don't forget to check out the CCEE Stampers blog to see the rest of the creations the CCEE Stampers have created this week. You can also see more details of their creations on their individual blogs.
Anne Harmon
Joanne Grzelak
Liz Williams
Lois Bak
Lynn McAuley
Frances Byrne
Vicky Gould
Kelly Santi
Maryann Einam- You are here

Thanks for stopping by....

Friday, March 30, 2018

Happy Birthday Hoots

My card today was made for a special friend's birthday last week. My friend loves interactive cards and owls, themes that I try to incorporate into my cards each year.


This is my first attempt at an acetate window card with a pop up inside.
For this card I created the inside first. I cut 3 pieces of designer paper just a bit smaller than the base card, and attached in place. The front panel was attached with temporary tape so that I could lift it and add acetate behind it once the window was cut. I then used the pop up mechanism to work out where I wanted the window on the front to be so that my owls would be seen through the window, when the card was closed. I then glued the mechanism in place and attached the label. Using a label die one size smaller I temporary attached it with the cutting side facing the front so that I could then cut out the window on the front panel. I then added the acetate and two die cut frames, using nested dies. I hope you can understand my instructions so far, If not Karen Burniston the designer of the pop up die has some great video tutorials that are easy to watch.
The owls are stickers covered with micro fine glitter and coloured with copic pens.
On the front of the card I have used the Happy Birthday die and layered the die four times. For the top layer I created an ombre look with distress inks. I coloured some white card with distress inks and die cut the tree and foliage adding it to the left side around the framework. I added some crystal nuvo drops to look like dew around the foliage. I just discovered that nuvo drops can take on the colour of distress ink that you apply it on top of, which I don't mind in this case.
The inside of the card was looking a bit plain after all that work on the front, so I added a stamped tree image, fussy cut it out and placed it behind the owls so they look like they are sitting on the branch.


Thanks for looking....................


Thursday, October 15, 2015

Stained Glass Butterflies

Welcome,
It is week 3 as hostess on CCEE Stampers Blog. I have challenged everyone to use acetate in some form for their project. When I thought of this project there was a technique I wanted to try, however I haven't had time to complete that card, so it is still on the to do list.
I went to a craft show last week and I wanted to use my new purchase Sakura Glaze pens.
I used Elizabeth Craft designs Butterfly Silhouette die cut a acetate piece and a overlay in black card backed with double sided adhesive to make a sticker. I then coloured in the butterflies using the glaze pens for a stained glass effect.


 I used a border punch to create strips of card to cover where I had attached the acetate to the base card. And placed a panel of designer paper inside.


Supplies
Elizabeth Craft Designs
Butterfly Silhouette, Butterfly Overlay 2, small butterfly, double sided adhesive
Sakura Glaze pens, Martha Stewart border punch, MFT Butterflies sentiment stamp, designer paper.


Thursday, June 19, 2014

White on White

Today's challenge on CCEE Stampers was to use white CCEE1425, I chose to create a white on white card, this is actually my first white on white card it is something that I have been wanting to try.  I have used embossing  for the background to add texture and die cut flowers for dimension. I wanted to sentiment to blend in as this is a sympathy card I wanted it subtle. I stamped the text onto acetate with stazon on ink and place it over the ribbon so that it blends in with the flowers. The final touch was to add the pearls.

Head on over to CCEE stampers blog to see what the other designers have come with.

Supplies:
Stamps: Kaisercraft
Sizzix tim holtz embossing folder, mft mini rolled roses die namics leafy flourish, daisy die, ribbon, foam dots, acetate, stazon ink, pearls


Have a great day
Maryann

Thursday, May 22, 2014

CCEE1421 Acetate

Today I have some exciting news to share with you I have been asked to be part of the design team for CCEE Stampers.... Cheer & Challenge Electric Ensemble. A group of stampers who share their passion of challenges.
Every week we will post a challenge for you to try and please link you work on our blog 
CCEE stampers so we can see it.
For this week the challenge is clear creations using acetate.


To create the background I use the Hero arts leafy vine stamp and stamped it on acetate with stazon ink. It was then layered onto glitter designer paper and attached with brads. Normally I would die cut the butterflies but I discovered these butterfly stickers at a new discount store and they matched perfectly for the silver, black and white theme.

 Thanks for looking
Have a great day
Maryann

Friday, December 28, 2012

Xmas Acetate

Here is one of Christmas cards that I made for this year.
On the base card I used a border punch and folded it over and finished the rest of the card with acetate. I die cut the trees twice, one for each side of the acetate and added glitter.
 I finished it off with string, button and a snowflake punch.
 The image inside can easily be seen through the acetate.
Supplies: 
Stamps: Heroarts
Paper: white and green card stock
Other: Martha Stewart border punch and snowflake punch, Tim Holtz sizzix tree line die, string, button glitter.


Thanks for looking
Maryann

Tuesday, December 13, 2011

Happy 21st Kait

Today's card is for my Darling Baby girl who turns 21 today, Kait put in her request a pop up card, so I had to put on my thinking cap. While I was thinking my Friend Frances posted a waving pop up on her blog and the timing was just perfect.
I thought this MFT stamp would work just great, stamped the image and paper pieced the dress using copics for the shading. Since I wasn't posting this card I wanted to add flowers and I guess I went alittle crazy it just kept growing.

As you can see the flowers on the inside is the reason for the ones on the front. It is great the way they just pop up when you open the card. This Mft stamp set was the one I was going to originally use, I was gald to be able to put it in there too. I coloured the image and cut it out and then used plaid glass finish on the wine glass.

This is another veiw of the opened card with the waving flowers.

Supplies:
Stamps: My Favorite things " A'la mode sets"
Paper: black, white, red card, DP- DCWV La creme stack & glitter stack
Other: MFT mini rolled roses die-namic, oval and scallop punch, leaf punch,sizzix swirls die, ribbon flowers pearls, acetate, nestabilities, Plaid glass finish,

Maryann

Thursday, December 10, 2009

Peek through Christmas

I have decided on a design for my Christmas cards this year, because we are sweltering here in 40 deg (104F) heat I thought of snow. The idea for this card came from a tutorial that I saw on
Dawns stamping studio some time ago. I didn't have the printed acetate so I improvised I think it turned out rather well. What do you think?
Stamps: MFT Sassy sayings
Paper: Real red, white card, acetate
Other: rocket red gold ink, cuttlebug snowflake die & eb folder,ms snowflake punch,kindy glitz, Kiki.k christmas ribbon, oval and word window punch, ms icicle punch

TFL
Maryann

Monday, November 30, 2009

Peek through window

Hello
While the cats away the mice will play. LOL DH is away fishing so I have lots of time to stamp, it is like having a holiday right here. I am having so much fun.
There are many ways to use acetate, from using it as the main card to a window. I saw this tutorial in August on Dawn blog, it was so different I thought I would give it a try, you would not believe how easy it is.
I used the same designer paper for both cards, but depending on the layering colours the different background colour just pop out.
The verse on the cards is rub on from a sheet that I purchased from a discount store, 17 rub ons for $2
Stamps: House Mouse
Paper: Kaiser craft Dp deck the halls, purely pomegranate,riding hood red,white, green
Other: nestabilities,copics, ds tape

Have a good day
Maryann

Wednesday, February 4, 2009


Well school is back so it is busy at work again, so that means less time for stamping and other things,( it was hard to go back after 9 weeks off), so I thought I would share a card that I made awhile ago.

I have used green bazzill for the base card. The white dragonflies have been stamped with stazon ink on acetate. The word dragonfly was stamped using Karen Foster snap stamps and punched it with the label punch. I then stamped the dragonfly with Kaleidacolor ink layered it with black attached the ribbon and label on the front of the acetate, backed it with black card and attached it with black brads.

Recipe:

Stamps: Stamp-it Australia - Dragonfly, Karen Foster - snap stamps

Paper : Bazzill card, Acetate, scrap card.

Other: Stazon ink - white, Kaleidacolor- fresh greens, ribbon ,brads.