Sunday, December 25, 2022

Sleigh of gifts

Merry Christmas everyone, I hope every is having a wonderful day.
This is the last of the stand-up box pop-up cards that I have made for this year.
These are the instructions that I have shared previously.
I made the card to fit into a business size envelope. I have used inches for my measurements, as I have used a score board with inch markings. I cut the card 4" in width. I then scored at 7", 8", 10" and 11" along the long side. Fold the score lines and glue the last tab to make a box. For this card I cut a separate piece 31/2" wide and score at 10", 11" the piece is then cut to size depending on the decorations. I then attached the card onto the base card using the tabs.


To decorate this card, I have used the sleigh that Karen Burniston for her previous licensed days. I also added the Santa that I received free in a magazine.

 Thanks for looking today.

Friday, December 23, 2022

No Peeking until Christmas

My card today is another this time I have made it as a landscape stand-up box pop up. This is another image that I had in the Christmas stash box. 
These are the instructions that I shared the other day. I just adjusted them, so that the picture panel fitted.
I made the card to fit into a business size envelope. I have used inches for my measurements, as I have used a score board with inch markings. I cut the card 4" in width. I then scored at 7", 8", 10" and 11" along the long side. Fold the score lines and glue the last tab to make a box. For this card I cut a separate piece 31/2" wide and score at 10", 11" the piece is then cut to size depending on the decorations. I then attached the card onto the base card using the tabs.


 Thanks for looking today...

Thursday, December 22, 2022

Purple Accordion tree

Today I have made an Accordion card in purple and gold colours. 


I have used the 1007 - Charm Accordion die from Karen Burniston Designs. This card is so quick and easy to make for those last-minute Christmas cards and they just look so stunning.


 Thanks for looking today.

Wednesday, December 21, 2022

Teddy box pop up

Yesterday I shared a card for the stand-up box pop up card. I came across this coloured image in my Christmas supplies. I had some leftover designer paper from a previous card so I thought I would make another card. I added the die cut sentiment to the top of the card, but it was too heavy, so I had to balance the card by adding extra card onto the base of the box, until it sat up without falling.


 Thanks for looking today.

Tuesday, December 20, 2022

Gnome box pop up card.

The card I am sharing is what I call a stand-up box pop up card, although it is called something different by other people. 
I made the card to fit into a business size envelope. I have used inches for my measurements, as I have used a score board with inch markings. I cut the card 4" in width. I then scored at 7", 8", 10" and 11" along the long side. Fold the score lines and glue the last tab to make a box. For this card I cut a separate piece 31/2" wide and score at 10", 11" the piece is then cut to size depending on the decorations. I then attached the card onto the base card using the tabs.


This is the side view of the boxes, the card folds flat for postage.


In the designer paper pack, there was a sheet of large panels that work great on the back of the card.


 Thanks for looking today.

Monday, December 19, 2022

Poinsettias for Christmas

Here are a couple of Christmas cards that I have made for this year. same stamps and papers but each have a different look.

      
I pulled out this poinsettia wood mounted stamp that I have for about 20years. It is a PSX brand which was made of really good rubber, so it has lasted.

I stamped the image in black ink and heat embossed it. I then coloured the image with alcohol ink and cut the sentiment with fish tail banner die.
The top card was matted with green card and designer paper. The second card was matted with gold card before adding it to the designer paper. The berries were coloured in yellow ink. It is amazing how different the two cards look so with the different matting papers.


 Thanks for looking today.

Thursday, December 8, 2022

Take Time to Celebrate


This is the final CCEE challenge for 2022.

 In fact, it has come to the time that the CCEE Stampers team to hang up their ink pads and stamps, so this will be our last challenge.

 While I have only been on the design team since June 2014, it was a blog that I liked to follow for inspiration since 2009 when I started my own blog. I, in fact did not even know when the original team, started and that it was previously call Cheers & Challenges Eclectic Ensemble.

I would like to take this opportunity to thank you all for your continued support of our challenges every week, and I hope you have found some inspiration in our challenges.

Time is counting down to the end of the year, and I so I am asking that your feature clocks on your card. Think of time clocks, stop watches or even a countdown clock anything to do with time.


I created the background using Distress Oxide inks Kitsch Flamingo and broken china, and distress ink wilted violet. sponging it through a stencil. I then used the wood mounted hero arts tag stamp - H4777 Collage Take Time and heat embossed it. I then added the die cut sentiment and numbers.

Don't forget to check out the CCEE Stampers blog to see the rest of the creations the CCEE Stampers have created this week. You can also see more details of their creations on their individual blogs.
Maryann Einam- You are here

Thanks for stopping by....

Thursday, December 1, 2022

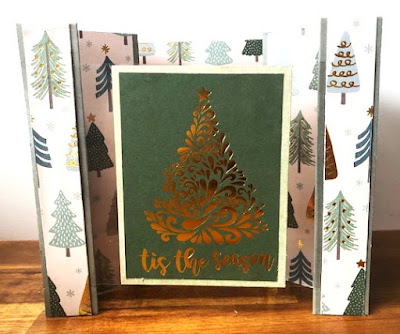
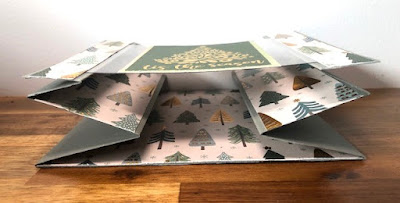
Double vertical stepper Christmas card

   Hi Crafting Friends

This month I am continuing as hostess on the CCEE Stampers blog. Since it is December, I have asked that we share our Christmas cards.

            Create a Favorite Christmas Card, any style that you like.


I recently went to a craft morning, and they were making Christmas card with inspiration from Sam Calcott and her Mixed up Craft tutorials.

This one is called the double vertical stepper.
You will need the following supplies to make this card.

2 pieces of 12′ x 6′ card for each side.

Score along the 12′ side at 6′, 8′, 10 & 11′

1 piece of 5.1/2 x 4′ card or acetate for the middle bridge piece.

Score along the 5.1/2 side at 3/4′ & 4.3/4

1 piece of 5.3/4 x 6′ pattern paper for the middle.

2 pieces of 1.3/4 x 6′ pattern paper for the inner side panels.

2 pieces of 3/4′ x 6′ pattern paper for the front panels.

1 piece of 3.3/4 x 3.3/4 & 3.1/2 x 3.1/2 mat and layers for the bridge panel.

I used a designer paper panel for the center and as it was a bit smaller than the acetate bridge piece, the paper panel looks like it is floating.


Don't forget to check out the CCEE Stampers blog to see the rest of the creations the CCEE Stampers have created this week. You can also see more details of their creations on their individual blogs.
Maryann Einam- You are here

Thanks for stopping by....