Thursday, March 20, 2014

Double Katie Pivot

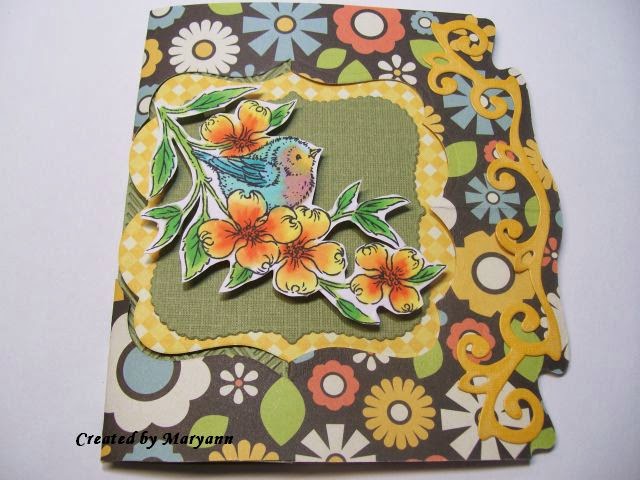
I have been wanting to try this Double Katie Pivot card ever since I watched the tutorial on Karen Burniston's Blog. I had the left over piece of designer paper and all the bits and pieces from the other Katie pivot card I made the other day. The good thing about these dies is that they fit into any size card. Just follow the link to watch Karen's tutorial for the best instructions.
 This cute little bird is a stampavie stamp bird on a dogwood branch. Now when I showed this card to my friends they wanted to know what I used to create the matting layers. While we love all the new products on the market it is not always possible in reality to buy them. So I looked at all my dies and found the ones from spellbinders fit quite comfortably in the double pivot.
 Here is the back view of the card, I just love the way it sits flat for mailing.
Thanks for looking.
Maryann

Wednesday, March 19, 2014

For my Friend

Hi Everyone,
Today I got together with a couple of friends, we catch up each month for a chat and a bit of shopping at our favourite craft/scrapbooking store and come home with a few new items. This year we decided to challenge ourselves to make the most if our purchases and create a card each month. For this month we are using the Katie Pivot die designed by Karen Burinston for Elizabeth Craft Designs that we purchased last month.

For the base card I used a thicker double sided designer paper and used My Favorite things die-namic flower and flourish for the front. The Sentiment is the Brackets2cut set designed by Stephanie Barnard for the stamps of life.
 This is the card opened the sentiments have been matted using the layered dies that come with the Katie pivot dies set. The side pieces were created with the Agatha edges dies and the flowers are another My Favorite things flower die.
 This is the back of card. I recently watched a demo from one of Elizabeth Craft and Karen Burniston design team member and she made the comment " How many cards have you seen that look great from the back as well as the front" that has stayed with me,as I use these dies, in this case it is so true.

 I used an embossed panel of cardstock for make the card more stable, now I have seen some cards with this panel or without the choice is up to you.

I certainly had fun using this die and made a few others which I will post over the next few days.
Thanks for looking
Maryann
Tuesday, March 18, 2014

Tomorrow is another day

Once a month I get together with a couple of friends for an outing to a craft store. After a trip in January we decided for this year we would choose a purchased item that we all own to create a card before we would meet up again. For the month of February with was to use any of the sizzix grid dies to create a project.
I started with the die cut frame in black and glued in place on Some blue sticker paper that looks like water. The cute little guy was coloured with copic pens and mounted with foam tape. The text is a my Favourite Things stamp and it was cut and mounted to look like a banner.


Thursday, March 6, 2014

Pink and Blue Challenge

I created this card for the special sister Pink and Blue challenge on Boomerang stampers list a yahoo group for rubber stampers. For this challenge we had to create a card and add some special gift inside for our special stamping sister.
The stamp and text are from My Favorite Things, the butterfly was cut out with the corresponding die and layered onto cut with spellbinders nestabilities. I have used a Martha Stewart border punch for the edge of the verse.
Thanks for looking
Maryann

Thursday, January 30, 2014

Step Dress

Once again I have used the Cheery Lynn Designs step die, I actually cut a few base cards out at once just to save time. The stamp I have used is a wood mount one from Stampendous and I have had it for many years. I stamped the image once on white card and then on designer paper and paper pieced the dress. In order to use the front panel die a measured inside the die on my stamped image and marked it with pencil and cut slits so that the die would sit flush with the dress overhanging. I coloured  some parts with copic pens and used glass finish liquid and pearls to add dimension.
 On the inside I used Cheery lynn insert die to cut the designer paper and MFT dies for the labels and flower. The flower pieces were run through a crimper for the corrugated look.

Have a good day
Maryann

Wednesday, January 29, 2014

Make a wish

Once a month I get together with a couple of craft friends and we do what craft friends do best we discuss craft project and go shopping at a craft store, it is a great way to spend the day. For this year we decided to set ourselves a challenge to make a themed card each month. Since we all purchased the Sizzix fancy Label stand up die designed by Stephanie Barnard this was our first challenge.
I used DCWV blossom song stack and cut out the base card, embellished the bottom half with scraps, Martha Stewart punch and a ribbon. The Dandelion wishes and stem stamps and die are from My Favorite things.

Have a good day
Maryann

Tuesday, January 28, 2014

Best Year

Hello there,
I created this card for the for the 10 minute online challenge for Stamphappy.
 Stamphappy  is a yahoo group for Australian and New Zealand creative rubber stampers.
 I find that using a die cutting machine with dies and designer paper a fun and quick way create cards.
For this card I used the Sizzix flip it die designed by Stephanie Barnard. 
 The designer paper is DCWV the blossom song stack, I have also used nestabilities circles and number die- n-namics from My Favorite things and a butterfly, pearls and ribbons for embellishments. The words are also MFT stamps.
Hope this is the best year ever.
Have a good day
Maryann

Monday, January 27, 2014

Up and Away

I created this card for the Art Impression challenge "Trips Ahoy" Nautical or Travel challenge 126. The  stamp set was released for the Obediah Fund to support Open Arms International's Kambi Teso outreach in Eldoret, Kenya., I am sorry to say it was a limited edition and is no longer available. 
I stamped the Balloon image coloured it with copic pens and cut it out, it is mounted with foam tape. The designer paper I have used for the background is Grace Taylor splish splash scrapbook kit.
For the base card I used the Cheery Lynn Designs step card die, it has 6 dies to create the base card plus all the panels even one for the inside.


Thanks for looking
Maryann

Wednesday, January 15, 2014

Coffee with friends

Hello there, 
I have been trying to get some photos of my cards with another camera and I have been having all sorts of problems, I must have taken over 30 photos of the front cover all bad, eventually I took one with my Iphone.
I caught up with friends for a cuppa over the holiday period and did a bit of tidying up the craft room, and I came across this un-inked stamp. So for this card I have used Art Impressions set Girlfriend Blend, designer paper scraps, bakers twine and a button.

 Inside the card I have used the pop n cut mug insert, I then cut out the mug out of designer paper and pieced it onto the insert mug. Then added the movers and shapers heart for the steam and embossed with the corresponding embossing folders on each side and highlighted them with ink.

I am entering this card into the AI challenge 125 - Expect the unexpected

Thanks for looking
Maryann


Sunday, January 5, 2014

Monster Mash

Welcome to 2014 I hope everyone has had a wonderful start to the New Year.
Today I thought I would share the card I made for my great niece's 5th birthday it was a monster themed party. While looking for ideas I came across a monster card that I thought I would case One eyed critter, I liked the idea to two eyes and different coloured hair. Most of the shapes are drawn free hand, but the circles I used 3 different sized nestabilities for them.

Have a good Day
Hugs
Maryann