Friday, May 23, 2025

Double Column card


I made this card after being inspired the tutorial by - 
Sam Calcott - Mixed up Craft - Double Column Card

I just pulled out a clear set of birthday stamps that were a gift to me, to make a card for stash of cards. 


Monday, May 5, 2025

Celebrate your Special Day


I made this card for a glitter challenge. I have used some glitter card stock behind this die cut frame, I then added the die cut floral image on to foam tape and added glitter nuvo drop as embellishments.
Some of the supplies I have had for many years, and some have been gifted to me.


Friday, May 2, 2025

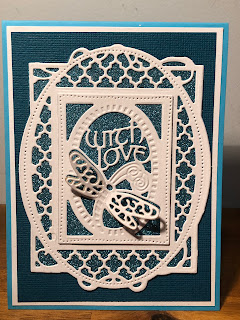
Glitter frame


 This was the trail card for a glitter challenge, I used the dragonfly delight keepsake frames from Tonic Studio. While it fit the challenge fine, I finally chose a different card and am happy to add this to my card stash.

Monday, April 28, 2025

Sailing fun


 Just a quick card to build up my supply stash. Using some cute designer paper and a Penny Black stamped image.

Monday, April 21, 2025

Embossed Flowers


 When I made this card, I was thinking of the blackout embossing technique, however when I was doing some research, I found a site that instead of using the debossed side with black ink, they showed using the embossed side and colouring in the lower area with a black sharpie pen, so that the image really pops out. (This is not my idea, but I wasn't able to find the tutorial of the original idea again.) I embossed the flowers on a pink card and highlighted areas with ink. Then did the black areas and added some gold ink to where the stamens would be for some dimension. This technique should work with any type of embossing folder, but it does look great with the 3D ones.

Thanks for stopping by.

Wednesday, April 9, 2025

Make a wish Little Bunny


 I have had this card pack for a while. It is a paper toile kit that I had purchased at a craft show many years ago. I thought it would be great for my Grandson's 1st birthday. The pieces are precut so you just separate them and add foam tape for dimension.

Thursday, April 3, 2025

Pop up Hexagon box blooms


Here is another Half Hexagon pop up box card. This it is a 5 x7 Landscape style.  On the back I created a panel where you can sign the card.


The card sits up for displaying and fold flat for postage.


Sunday, March 30, 2025

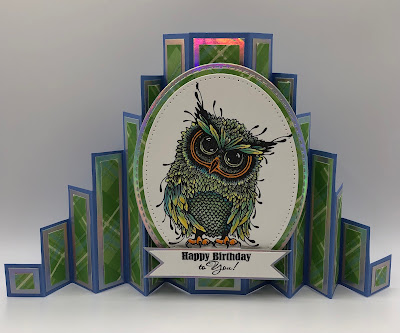
Double Concertina Stepper Card


I am calling this, an inspiration card as it is a birthday card for a friend who enjoys owls. The gorgeous owl is Gus from Lavinia Stamps. He is rather large, so he fills the card. I have used copic pens to colour him in. I went with a showstopper card style for inspiration from Sam Calcott - Made to Surprise - Double Concertina Stepper card


The card fold into a 5 x 7 envelope for postage. It is rather thick so you will need extra stamps for postage.

Thanks for stopping by.

Sunday, March 23, 2025

Gone Fishing


 Just a quick card to build up my supply of male themed cards, using this Penny Black image that I have coloured with alcohol markers.

Monday, March 17, 2025

3 Rainbow Unicorns


 I made this for my Granddaughter who turned 3 last month. It is a slimline card and I went stash diving for some designer paper to create the background. I then stamped, coloured and fussy cut out the unicorns images.


Saturday, March 15, 2025

Half hexagon box pop up card


 This was my first interpretation of the of the Half Hexagon pop up box card (non-floating). There are many online tutorials for this design. I watched a few before making this in a 5 x7 portrait style. I used two panels of die cut flowers, when glued together they were rather heavy. 
What I really needed was to add a strip of acetate behind for extra support, which I did with the next one I made, and you can see the link here. On the back I created a panel where you can sign the card.

Friday, March 14, 2025

Stenciled Background


 Just another card for my supply stash. I started with the stencil background in distress oxide ink - twisted citron. I was given the floral and stamp and die set. I added some nuvo drops around the edges. 

Wednesday, March 12, 2025

Old World Collage


I went stash diving into my old rubber stamps for this card. I think this stamp is about 15-20 years old when stamps were made of rubber, this one was one of the first unmounted rubber stamps that I owned.  I stamped the image onto cream card stock, and highlighted areas in blue copic pens. I then coated it is several layers of ultra thick embossing powder (UTEE) to make the embellishment for the card. The background was a clear stamp that I heat embossed.


Tuesday, March 11, 2025

Celebrating with friends


I thought I would make a card for a friend's Grandson for his birthday. I used the Spellbinders - Say Cheese Classic Pooh Collection - Etched Dies - Pooh and Friends Silhouette, but I couldn't decide what paper to use for the background, so I made 3 cards.


I used some striped designer paper to resemble the sun setting sky and die cut the images on black card.
I die cut the image twice and layered them together for some dimension and added the black frame.


On this one I have used designer paper with part of a tree and a sky background.
I made the inside a bit different in each card by reducing the die cut characters.


I really liked this designer paper and thought I would make the same style card in a pink colour theme.


Thanks for stopping by.

Monday, March 10, 2025

Blackout Embossing


 For this card I have tried the Blackout Embossing technique. I used kraft card stock and embossed the card. Then on the de-embossed side I rubbed over the card with a black inkpad, leaving the de-embossed area the Kraft card colour and the raised area dark resembling a suede look. I then added the ribbon, sentiment and die cut daisy flower.

Thursday, February 27, 2025

Half Hexagon pop up box card


This is my interpretation of the of the Half Hexagon pop up box card. There are many online tutorials for this design. I watched a few before making this in a 5 x7 portrait style. I have used the Gina K - Master Layout 4 for the heart element. The hearts are heavy, so I added a strip of acetate behind for extra support. On the back I created a panel where you can sign the card.


 Supplies

Gina K - master layout 4, you are enough stamp set
Karen Burniston - Charm heart