Tuesday, December 31, 2013

Favourite Five creations

                   Let me take this opportunity to wish everyone a Happy and Healthy New Year.
 It is time to share with you my top five cards, since I didn't make too many this year it wasn't a difficult task.                                One thing I did notice was that pop n cut cards were highly featured, construction cards are great fun cards to make and they are so easy using a die cutting system.
                                        Each title under the photo will take you to the original link.


                                                       January - Cherish Anniversary

                                                                  April - Groovy Day


Thanks for looking at my cards, if you wish to see other top five cards you can find other links on Debby Yates's blog A Scrapjourney

Have a great Day
Maryann

Sunday, December 29, 2013

Dress Up Pop n cut

While looking through my card photos for 2013 I discovered a card that I had not shared. Which came in handy because after taking all those card photos over the last few weeks my very first digital camera broke, now when I think back this camera has to be over 15 years old, and only took 2mega pixel photos. So luckily I won't have to rush out for a new one as I am going to try my daughter's old one, once I figure out how to use the software, it take 7.1 mega pixel photos, which I know is not all that brilliant by today's standards.
Now on to the card, this card was my first attempt using the Stampin Up pop n cut platform base die and the dress up framelits set. I didn't feel the need to purchase all the other matching products from stampin up because I felt I could still create a great card using my other pop n cut products, like all the Karen Burniston designed products they all complement each other.
I started with the framelit set All dressed up it comes with 3 different dies, two dresses and a dress stand. I used chocolate chip card for the dress stand and designer paper for each dress. I then glued the sleeveless dress onto the stand for the other dress I cut it to waist length and the cut up the middle to create two pieces and shaped them to look like a jacket attached it and added small gems to look like buttons. I then cut out the base and attached ric rac ribbon and designer paper and  a gem flourish.
 For the inside I used the same designer paper as the front panel and cut out the Funky 3d label insert and matching framelits. the words are from stampin up but I don't keep up with what is discontinued or current. The floral border was created using a Martha Stewart border punch.

I hope you liked looking at this card, I had so much fun creating it.
Maryann

Saturday, December 28, 2013

Favourite Five

Once again I am sharing my top five Christmas cards. A challenge from Debby Yates from a scrapjourney blog I have been so very lacking in creative mojo this year that I was lucky to 5 xmas cards in fact if I hadn't been on holidays the last month I don't think I would have. This is my 17th post for this month for the other 11 months of the year I have only managed 22 in total.
                                                   
                                                                       Christmas Fairy
                                                                Polar Bear Flip it
                                                      Distressed Poinsettia
                                                                 Deer Pop n cut
                                                                 Furry Friends

I hope that you have enjoyed my cards.
Hugs
Maryann

Friday, December 27, 2013

Distressed Butterfly


Playing with distressed inks and the direct to paper technique I created the background for this Papermania Urban stamp distressed the edges and layered it, Then added the distressed flower and button and twine. The edge of the card was cut using a spellbinders border die. For a finishing touch I added smooch spray paint in gold.
Stamps:
distressed ink, smooch, button, thread, flowers, spellbinders border die,

Have a great day
Maryann

Wednesday, December 25, 2013

Christmas table

For the first time in 25 years we are spending Christmas without our girls, the youngest is overseas and the older one is spending Christmas with her boyfriends family. So we had our Christmas dinner a few days ago. 
    This year I decided to create a center piece for the table, I had this set of candle holders in the cupboard.
The flowers were made by using the die by Sizzix called Tattered Poinsettia. I used  Distressed ink and an old crackled backgound stamp to age the flowers. The Holly leaf flourish is a Cheery Lynn design. Instead of using the tealights that came in the set I purchased battery operated tealights.

I hope everyone has a safe and happy Christmas.
Maryann

Tuesday, December 24, 2013

Xmas deer pop n cut

Another card made with the Sizzix  pop n cut platform, this time I used the designer paper for the outside and cut it to fit the card based insert, adding a Martha Stewart border punched strip to embellish. 
In this photo the trees look like I have use two different inks but I just double stamped without re-inking.The deer and trees are from a stamps and framelits set from Sizzix  and the insert is the sizzix pop n cut magnetic insert 3D label die
Sometimes it is easy to just use the tools that are out on the table, the label dies and stamp are the same as my earlier posts.
Have a great day.
Maryann

Polar Bear dreaming

This card was made using 3 different Sizzix dies that all work together with the pop n cut platform, they are all designed by Karen Burniston. 
I love the idea that Karen has that all her products can be used with each other.
Again I have used the Stampavie Laurence collection star gazing stamp, with some other winter stamps. I was going with white snowflakes but because I used textured card the image didn't stamp clear so I then overstamped the snowflakes with a dark blue ink.

Maryann

Monday, December 23, 2013

Merriest Wishes

Taking a break from all the flip it cards and playing with my envelope punch board. This is my first attempt at a file card, it is fairly easy to make and I am sure will make lots more of them next year.
I have used a favourite Penny Black image and spellbinders nestabilities dies and some xmas ribbon.

Maryann


Polar Bear Flip it

Here is another Sizzix circle flip it card, combining a memory border die and Laurence Collection stamp Star Gazing  from Stampavie.
                                             Love the interactive card they are so much fun.

Xmas Poinsettia

Hi everyone,
Today I played with my Sizzix pop n cut platform designed by Karen Burniston. I cut out the base card without the insert and used designer paper on the bottom half. I cut out the Poinsettia using the spellbinders die and the border die is from MFT and added some rhinestones.
I then popped in the insert to cut out the designer paper for inside the card and matched it with two parts of the MFT layered treat die and the Hero Art words.
Now lining up the base card with the insert can be rather tricky but if you take your time you can achieve great results. If you are impatient you can cut down either the insert or the base and embellish for a different look.

Hope your enjoyed looking at this card.
Maryann

More Flip its

Here are a few more Flip its, they are really so quick to make.


Sunday, December 22, 2013

Having a Flipping good time

I have been have fun creating flip it cards, they are quick and look fantastic. I have used two different ones but there are several shapes to choose from, I just combined designer paper scraps and border punches for a great look. 
 
                                           This one is using a MFT snowman.
                                          And this is a Penny Johnson designed stamp from Stampavie
Thanks for looking
Maryann

Friday, December 20, 2013

Furry Christmas friends

I just love this stamp, I used to have a cat and dog but the were never good friends like this. The stamp is from Stampavie Laurence Collection and I have coloured it with copic pens. 
The base card is a Sizzix Fancy Flip it die .While sizzix do make a insert die to match it is still on my wish list but what I did have was the spellbinders nestabilities label one and scalloped label one and the are a pretty close match.
                                           Here is the card flipped open.
                                       The borders down the side are MFT die-namics oval chain.
Thanks for looking
Maryann

Christmas Fairy

This cute Fairy is a Mo Manning image created by Penny Black, I coloured her with copic pens. The base card is the sizzix Pop 'n cut square base with ornate edge, these pop n cut card are so much fun to create.
Inside I have the circle insert and matched it with My Favorite things layered treat tag die-namics.  I then used the ornate flourish for embellishments.
Have a good day.
Maryann

Thursday, December 19, 2013

Christmas Distressed Poinsettia

There are so many versions of a Poinsettia Dies this one is Tim Holtz version made by Sizzix called Tattered Poinsettia. I used Tim Holtz Distressed ink and an old crackled backgound stamp to age the flowers. The embossed panel was made using the direct to embossing folder technique with distressed ink. The Holly leaf flourish is a Cheery Lynn design
Stamps: Hero Arts phrases CL543 Alesa Baker Designs G6148
Ink: Distress ink, vintage photo, shabby shutters, old paper
Other: Sizziz die, Cherry Lynn die, Wild Poinsettia embossing folder Couture creations, crystal stickles

I off to create so more, have a great day.
Maryann

Wednesday, December 18, 2013

Xmas Circle flip it

This card was made using the Sizzix circle flip it die
 
                                                                Opening the Flip
                                         The Card fully opened with a place for you message
The image was a Penny Black and the text inside is from Hero Arts. The Designer Paper is docrafts Papermania Home for Christmas collection.

3 x 3 gift cards

I created some 3 x 3 gift cards using various dies and stamps for a Xmas gift this year.
I have had the envelope punch for a few months but haven't really had the chance to play with it. The are some many different things that you can make with it. I decided to create a gift box for my cards, because I was giving several cards I had to adapt the sides to suit. All my measurements will be in inches because the envelope punch board and paper cutter have those markings. I cut designer paper 7" x 7" lining up the card I punched a 3" and scored flipped 90 degrees and punched and scored the did the same for the other sides, then I did the same again but measured at 4" the gave me the second score line for the box depth. I then rounded the top flap and cut the small squares that the scored lines created.
When the box was completed I decorated it with a belly band punched with a Martha Stewart border punch and Sizzix stamps and dies.
I then created a larger box to house the smaller box and Christmas card, instead of putting them in a gift bag.

Thursday, December 12, 2013

Summer Fun

Yeah, Finally I have had time to made a card and up load it, December is the first month of Summer here in Australia, while it has been a mild one so far I am sure it will warm up very soon.
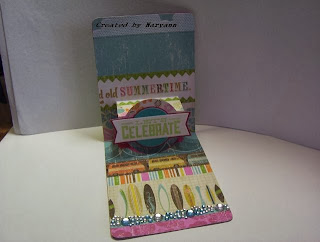
To start, the base card was cut using the sizzix A2 pop n cut base, the background paper is from the surf's up DCWV stack. The image is a Stamping Bella Uptown Girl Sandy and her sombrero, the waves is a memory box die.

 The insert paper is another page from the DCWV stack cut using the circle circle label insert pop n cut. The message is a MFT Stamp and it was layered using the MFT Die-namics Layered treat tag. The finish off the card I added gem stones to look like water droplets.

Thanks for looking
Maryann

Wednesday, December 11, 2013

Follow my blog

Follow my blog with Bloglovin

After the closure of Google Reader I wasn't sure how to keep up all the blogs and challenges that I was used to doing, so it was put in the too hard basket. I recently came across the blog lovin site and thought I would give it a try. Hopefully I will get back to posting my cards soon.